Data Mappers
Data Mappers group related properties, for example for one machine or production cell. They are mainly used to standardize raw source data before sending it to other systems.
Use Data Mappers to:
- combine data from multiple connectors into one logical machine model
- rename raw source values to a cleaner, shared naming structure
- normalize units and datatypes before sending data to other systems
- standardize raw machine data into a unified namespace or JSON payload
Transformations
Transformations create a new Data Mapper property from one or more existing properties. Use them to normalize names, reshape payloads, convert datatypes, and build a unified namespace with JavaScript. The script runs again whenever one of the input values changes.
Typical uses are:
- mapping vendor-specific tags to a shared machine model
- building a JSON payload for a unified namespace topic
- converting machine states and alarm codes to standard labels
- combining multiple source properties into one structured payload
Creating a transformation
In the flow editor, add a Data Mapper from the flow menu and then create a transformation property from the Data Mapper menu.
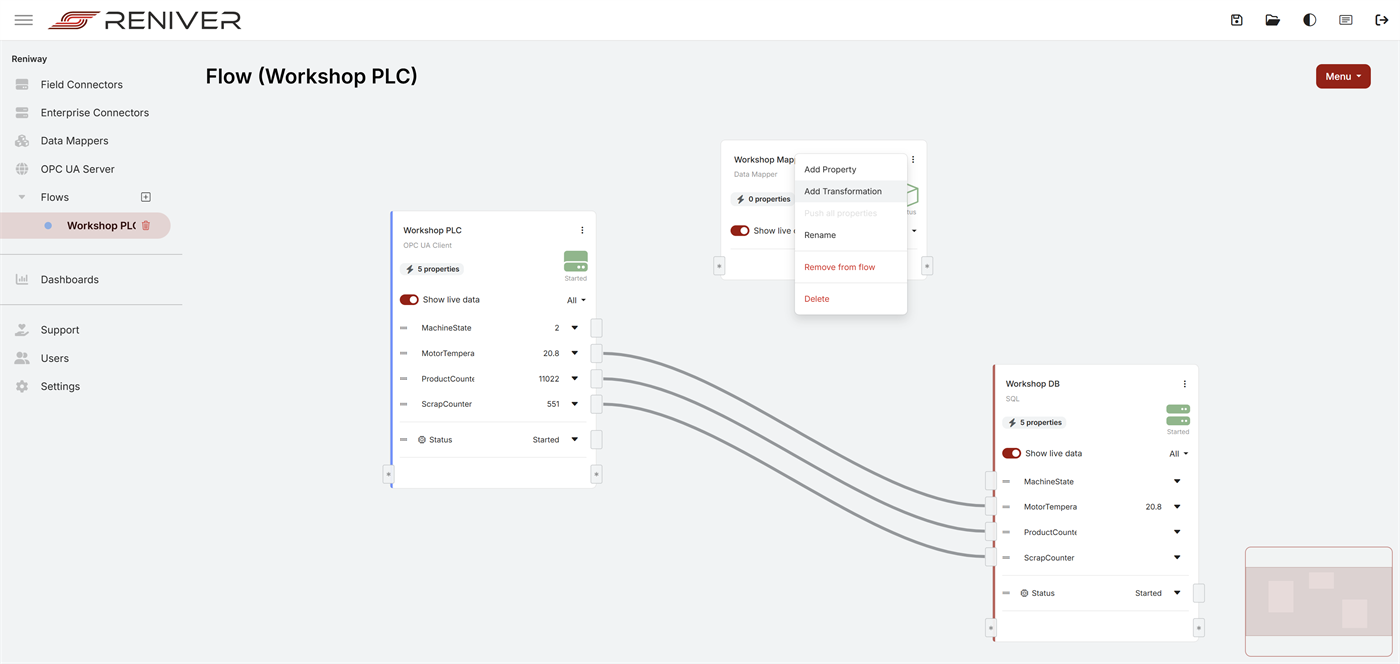
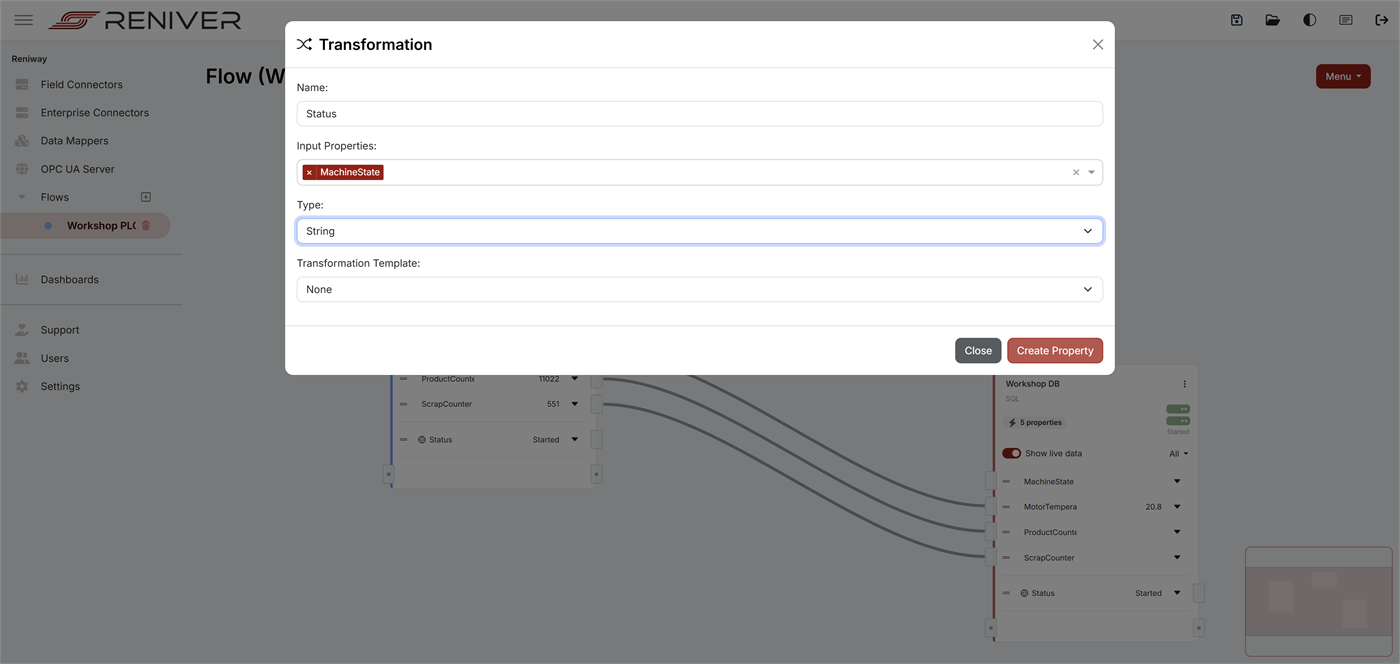
When creating the transformation, you define:
- the transformation property name
- the input property or properties
- the output datatype
Standardizing data with a unified namespace
Use Data Mappers as the normalization layer between raw machine data and the rest of your architecture. Different machines may expose values like:
Temptemp_cTemperature1MachineStatusRunState
You can standardize them into one shared structure such as:
{
  "site": "Plant1",
  "area": "Line2",
  "machine": "Filler01",
  "temperature": 23.4,
  "state": "Running",
  "timestamp": "2026-04-08T09:30:00Z"
}
This keeps source-side differences in one place and simplifies downstream integrations.
How the JavaScript editor works
The transformation editor is split into three parts:
- a read-only header generated by Reniway
- an editable JavaScript body where you write the logic
- a read-only footer that returns the output value
The generated header exposes the selected input properties as JavaScript variables.
For numeric properties, Reniway already applies parseFloat(...) or parseInt(...) in the generated
header. Non-numeric values are passed through as-is.
The same input values are also available through msg.payload[propertyId].
The generated code structure looks like this:
const Temperature_C = parseFloat(msg.payload[12]);

let result = Temperature_C;

// Write your own logic in the editable body.

return {
  value: result
};
Input property names are converted to valid JavaScript variable names.
For example, Temperature C becomes Temperature_C.
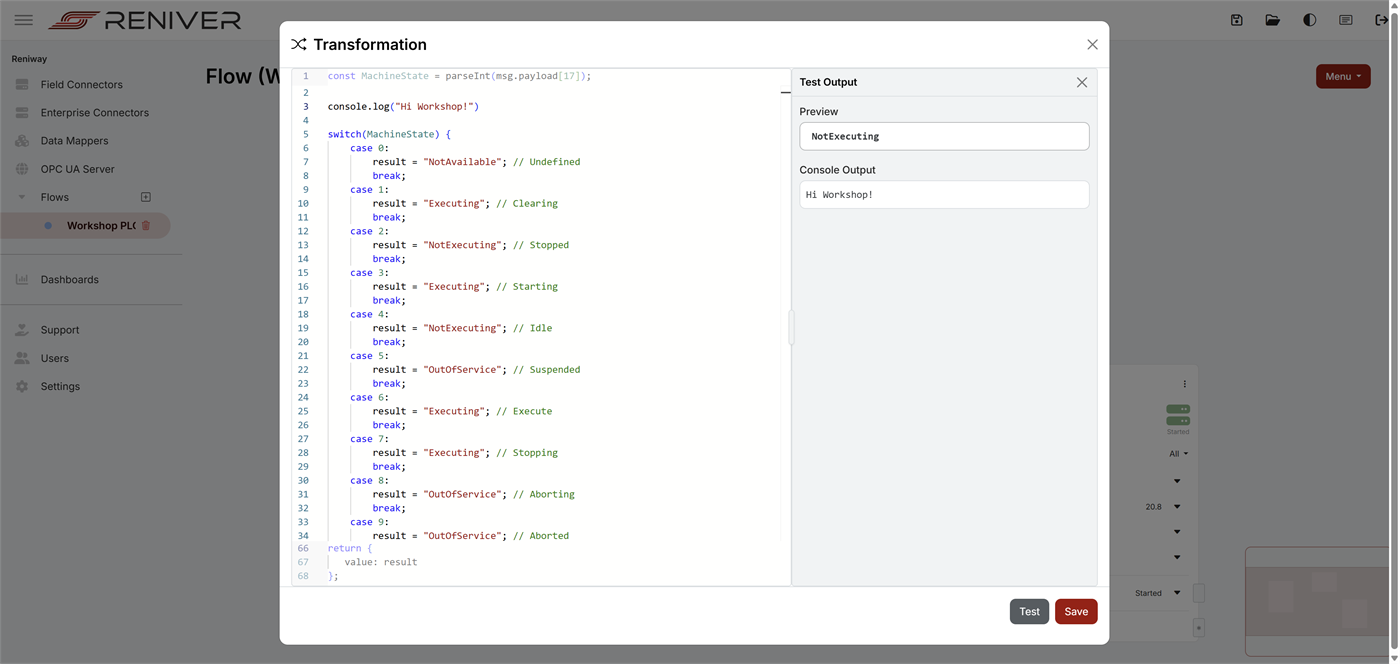
Testing and debugging
Use the Test button in the transformation editor to execute the current function with the latest available input values.
When you click Test:
- the transformation is executed immediately
- the calculated output appears in the
Previewwindow - any
console.log(...)output appears inConsole Output
This is the fastest way to validate mapping logic before you connect the output further into the flow.
Using console.log(...)
console.log(...) can be used while developing or debugging a transformation.
Typical uses are:
- checking the incoming values
- verifying which branch of a
switchorifstatement is executed - inspecting intermediate calculation results
Example:
console.log("MachineState:", MachineState);
Returning no value
If the script exits with return; or otherwise returns without a value, the transformation exits without sending a result on its output.
This is useful when:
- you want to suppress output for invalid input combinations
- you only want to emit a result when a condition is met
- you want to stop processing early
Example:
if (Temperature_C == null) {
  return;
}
JavaScript tips
- edit only the middle body section in the transformation editor
- use
console.log(...)while testing; the output is shown inConsole Output - every selected input property must already have a value, otherwise the transformation cannot be previewed
- the final result must be returned as
value - use
return;when the transformation should exit without producing an output value - choose the output type
jsonwhen the transformation should produce a structured payload
JavaScript Examples
The snippets below are examples for the editable body section only. The header and footer are generated automatically.
Map raw tags to a unified JSON payload
Use this when different source properties should be published as one standardized payload.
result = {
  machine: "Filler01",
  temperature: Temperature_C,
  pressure: Pressure_bar,
  state: MachineState
};
Normalize vendor-specific state codes
This is useful when a PLC exposes numeric or vendor-specific values that should map to one shared state model.
switch (MachineState) {
  case 0:
    result = "Stopped";
    break;
  case 1:
    result = "Running";
    break;
  case 2:
    result = "Fault";
    break;
  default:
    result = `Unknown state (${MachineState})`;
    break;
}
Create a compact machine model
This example combines multiple raw inputs into one structured model that other systems can reuse.
result = {
  machine: {
    id: "packer03",
    name: "Packer 03"
  },
  process: {
    state: MachineRunning ? "Running" : "Stopped",
    batchId: BatchId
  },
  metrics: {
    goodCount: GoodCount,
    rejectCount: RejectCount
  }
};